
Pritana User Manual
Fast, Free Photo Printing (Windows & macOS)
A practical guide to getting prints that look right—quick start, ICC color management, and brightness compensation for dark prints.
Quick Start Guide
Get started with Pritana in just 5 simple steps:
Import Photos
Click "Add Photos" button in the Library panel, or drag and drop photos directly into the application. You can also scan a QR code to upload from your mobile device.
Select a Photo
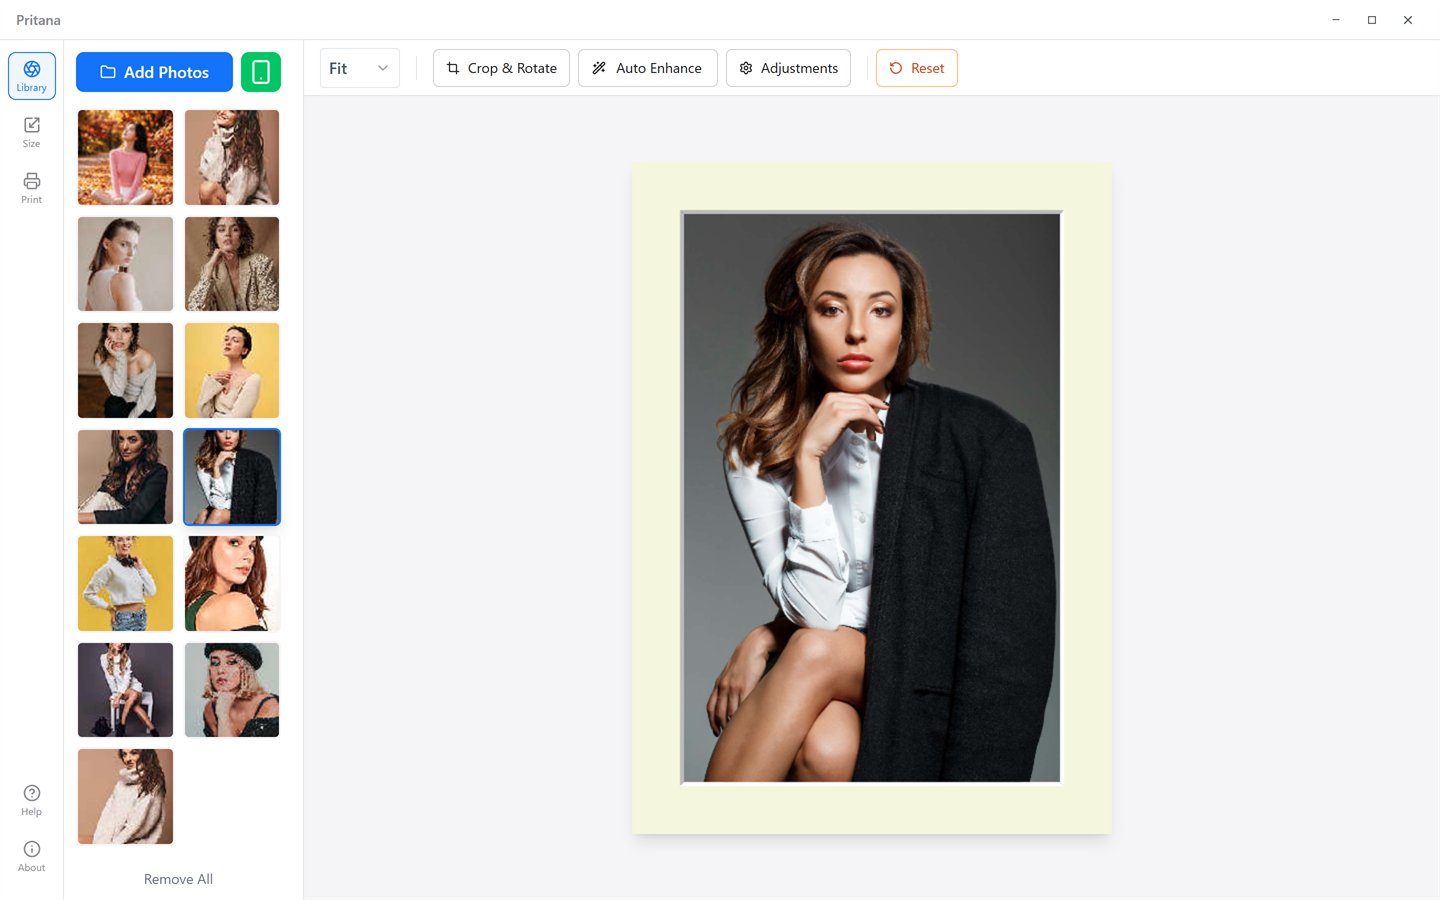
Click on any photo in the Library to select it. The selected photo will appear in the central preview canvas.
Set Frame Size & Mat Board
Navigate to the Preview panel to choose your frame size (e.g., 8×10") and optionally add a mat board with your preferred color and width.
Enhance Your Photo
Use the "Auto Enhance" button for one-click optimization, or manually adjust brightness, contrast, and saturation. Crop and rotate as needed.
Go to the Print panel, select your printer, paper size, and preferences, then click the "Print" button to send your photo to the printer.
Interface Overview
Pritana features a clean, three-panel layout designed for efficient workflow:
┌─────────────────────────────────────────────────────────────────┐
│  Title Bar                                           [─] [□] [×]│
├───────┬─────────────────────────────────────────────┬───────────┤
│       │                                             │           │
│  Nav  │              Canvas Preview                 │   Side    │
│  Bar  │              (Main Work Area)               │   Panel   │
│       │                                             │           │
│  [L]  │    ┌─────────────────────────────────┐     │  Library  │
│  [P]  │    │                                 │     │  Preview  │
│  [X]  │    │      [Your Photo Here]          │     │  Print    │
│       │    │                                 │     │           │
│  [?]  │    └─────────────────────────────────┘     │           │
│  [i]  │           Toolbar (Crop, Adjust, etc.)     │           │
└───────┴─────────────────────────────────────────────┴───────────┘
Left Navigation
Quick access to Library, Preview, and Print panels. Also includes Help and About buttons at the bottom.
Canvas Area
Central preview showing your photo with frame and mat board. Drag to reposition, Ctrl + scroll to zoom, double-click to fit. Interactive toolbar for editing.
Side Panel
Context-sensitive panel showing Library (photos), Preview (frame/mat settings), or Print (printer configuration).
Photo Management
Importing Photos
File Browser
Click "Add Photos" button to open file browser. Select one or multiple image files.
Drag & Drop
Drag image files from your file explorer directly into the Pritana window.
Mobile Upload
Click the phone icon to generate a QR code. Scan with your mobile device to upload photos wirelessly.
Batch Import
Import multiple photos at once. Duplicate detection prevents re-importing the same photos.
Supported Formats
Managing Photos
- ✓ Select: Click on a thumbnail to select a photo for editing and printing.
- ✓ Delete: Hover over a photo thumbnail to reveal the delete button (×). Click to remove.
- ✓ Print History: The database tracks print count and last print time for each photo.
Image Editing
Crop Tool
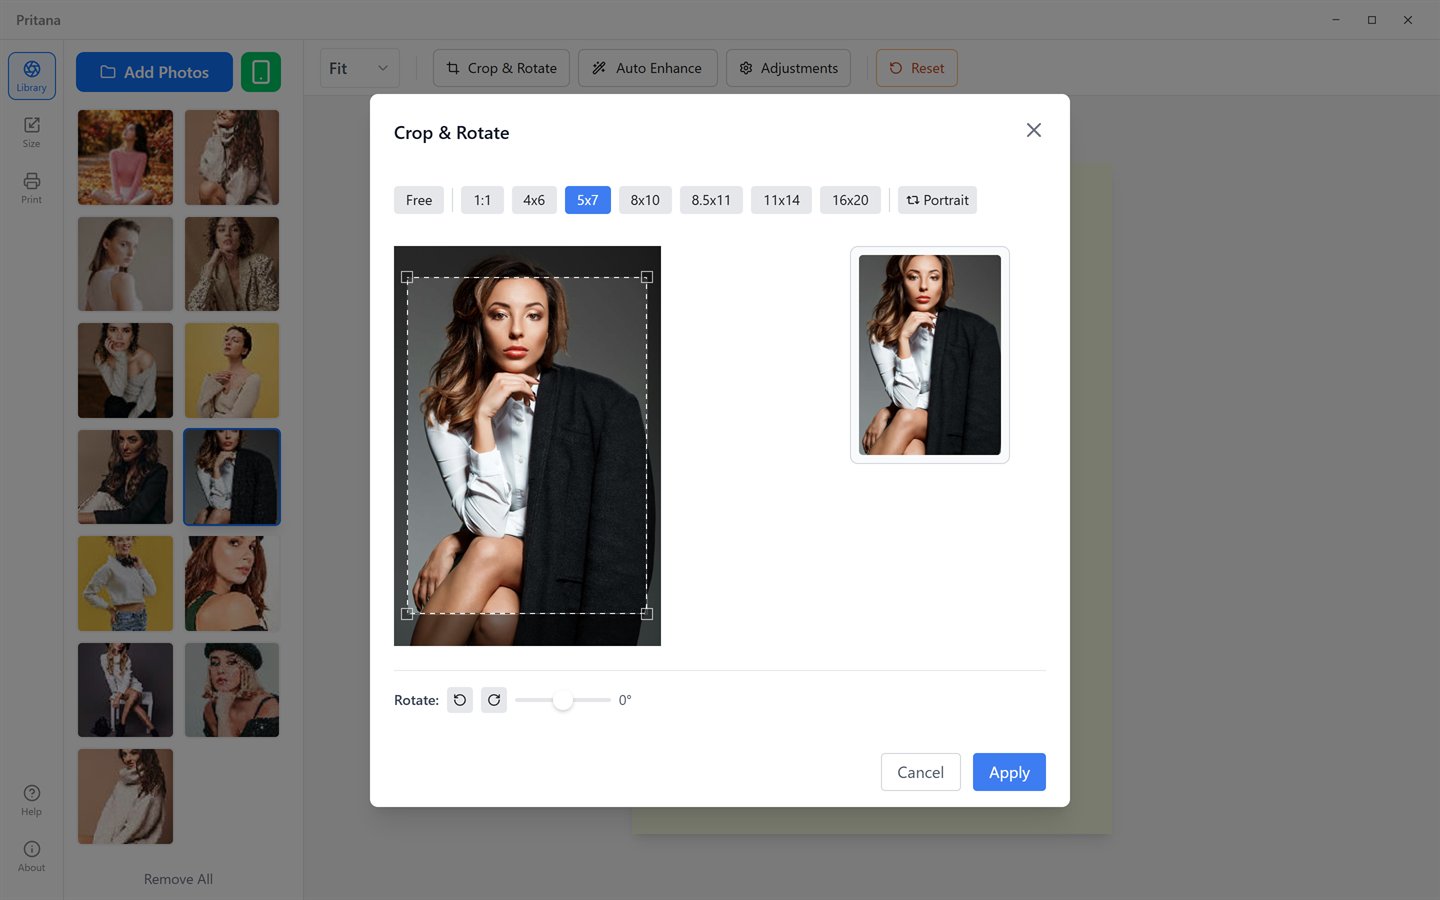
The crop tool supports multiple aspect ratios (4×6, 5×7, 8×10, etc.) and allows precise positioning with real-time preview.
Canvas Controls
Pan
Click and drag the image to reposition it within the frame.
Zoom
Hold Ctrl (⌘ on Mac) and scroll to zoom the preview (add Shift for 5% steps), pick a preset from the toolbar, or double-click the canvas to fit.
Rotate
Click the rotate button to rotate the image by 90° increments.
Crop
Open the crop tool to select and apply a custom crop area.
Image Adjustments
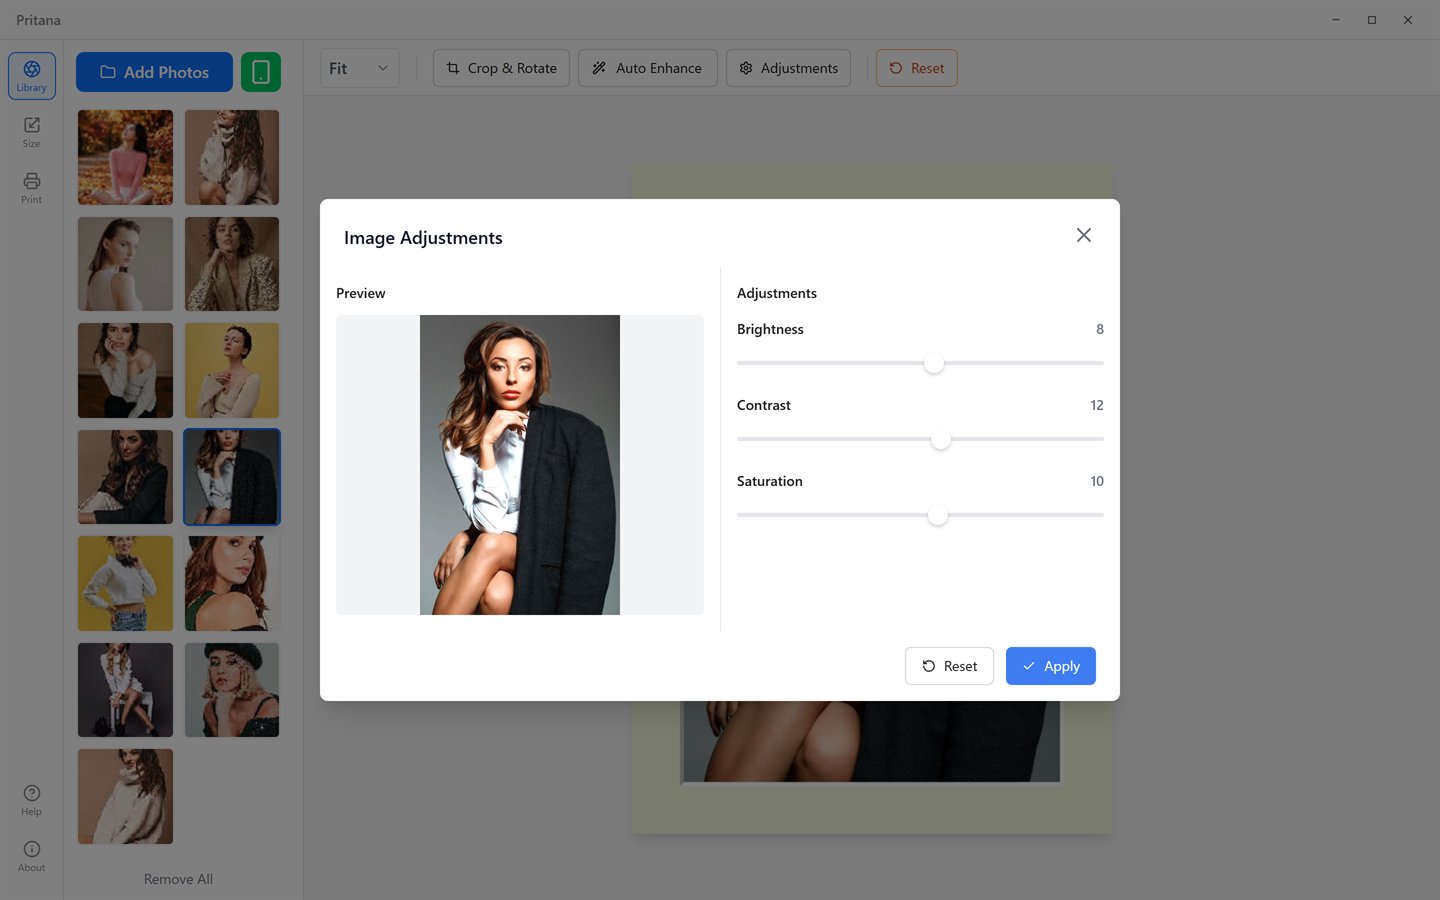
Open the Adjustments panel from the toolbar to fine-tune your image:
| Adjustment | Range | Description |
|---|---|---|
| Brightness | -100 to +100 | Adjust overall image lightness |
| Contrast | -100 to +100 | Enhance or reduce tonal difference |
| Saturation | -100 to +100 | Control color vibrancy |
Pro Tip
Use the Reset button in the toolbar or press R to restore the original image and clear all adjustments.
Frame Size & Mat Board
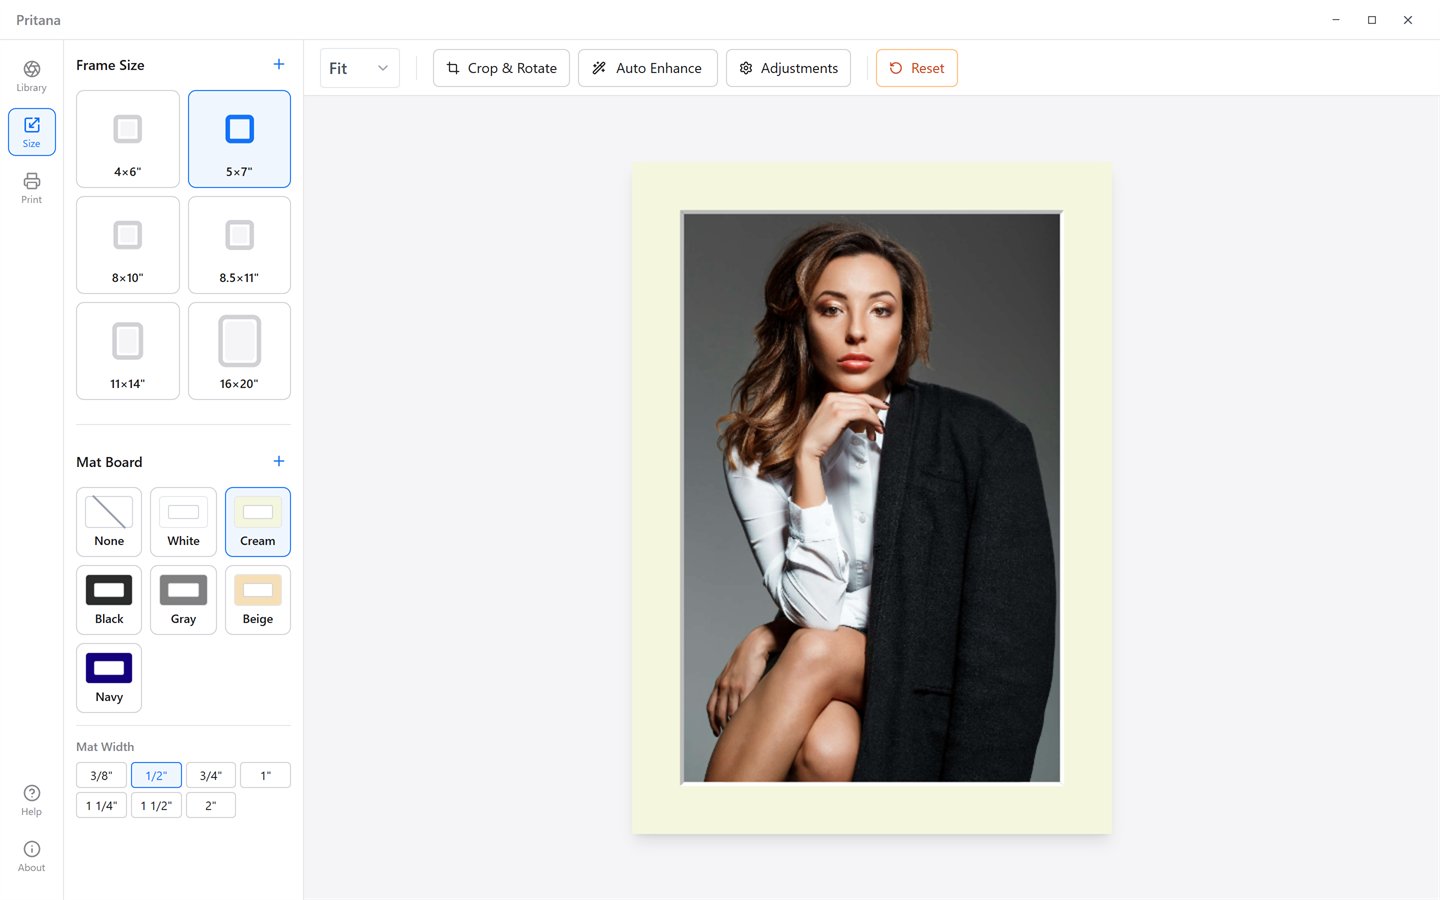
Preview your photo with different frame sizes and mat board options before printing.
Frame Size Selection
Choose from standard frame sizes to match your physical frame:
2.5×3.5"
Standard
Medium
Large
Letter
Extra Large
Poster
Large Poster
Mat Board Options
Add a professional mat board to your print with 6 color options:
Mat Width: Choose from 3/8" to 2" for your desired border width.
The mat board creates a professional 3D effect in the preview, showing exactly how your framed photo will look.
Print Settings
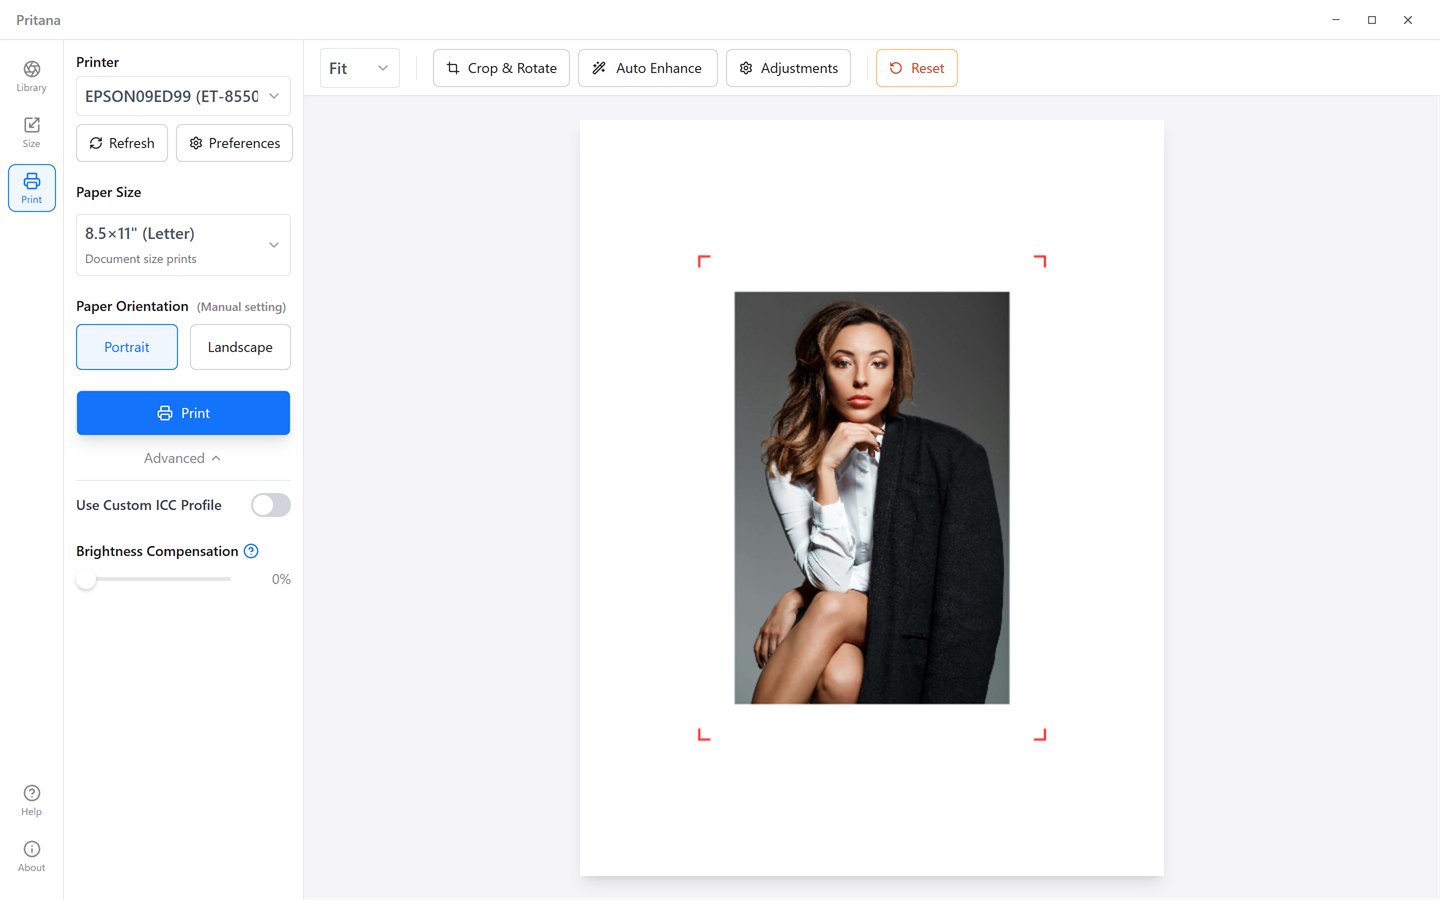
The print panel provides complete control over printer settings, paper size, ICC color management, and brightness compensation.
Printer Selection
Pritana automatically detects all available printers. Select your preferred printer from the dropdown menu. Use the refresh button to update the printer list if you connect a new printer.
Paper Size
Choose from standard paper sizes or enter custom dimensions:
- • Letter (8.5×11")
- • Legal (8.5×14")
- • 4×6" Photo
- • 5×7" Photo
- • A4 (210×297mm)
- • A3 (297×420mm)
- • 8×10" Photo
- • Custom Size
Paper Orientation
Paper orientation is a manual setting and is independent of the photo's orientation: choose Portrait or Landscape to match how the sheet is loaded in the printer. The print preview shows the sheet, the photo and crop marks exactly as they will be printed.
Print Resolution
There is nothing to configure. On Windows, Pritana reads the printer's native DPI when you select it; the photo is rendered from the full-resolution original at up to 600 DPI for the printed size, then sharpened for paper. Small originals are upscaled with a high-quality filter rather than stretched by the driver.
Color Management
ICC Color Profiles
Pritana supports ICC color profiles for accurate color reproduction:
- ● Enable "Custom ICC Profile" toggle in Print settings
- ● Click the folder icon to browse and select your printer's ICC profile
- ● Colors are automatically converted from sRGB to your printer's color space
Brightness Compensation
Printed photos often appear darker than on screen. Use the Brightness Compensation slider (default: 15%) to compensate. Increase if your prints appear too dark.
Color Tips
- • For best results, use ICC profiles specific to your printer and paper
- • Test print a sample image to calibrate brightness compensation
- • Ensure your monitor is calibrated for accurate preview
AI Image Enhancement
Pritana features professional-grade AI enhancement that automatically optimizes your photos for printing.
Smart Image Type Detection
The AI automatically detects 8 types of images and applies optimal settings:
Skin tone protection, gentle sharpening
Enhanced contrast and saturation
High contrast, fine sharpening
Noise reduction, preserve atmosphere
Preserve bright tones, gentle processing
Preserve dark tones, appropriate contrast
Sharp, accurate colors
Fine detail enhancement
Professional Features
- ✓ USM Sharpening: Industry-standard Unsharp Masking with DPI-adaptive parameters
- ✓ Smart Noise Reduction: Automatic noise detection and bilateral filtering
- ✓ Skin Tone Protection: YCrCb color space detection preserves natural skin tones
Mobile Upload
Easily transfer photos from your smartphone to Pritana:
-
1
Start the Upload Server
Click the phone/QR code icon in the Library panel toolbar.
-
2
Scan the QR Code
A QR code appears. Use your phone's camera to scan it.
-
3
Upload Photos
A web page opens on your phone. Select and upload photos which will appear in Pritana automatically.
Note: Your phone and computer must be on the same local network. The server runs on port 9181.
Keyboard & Mouse Shortcuts
Troubleshooting
Printer not showing in the list
Ensure your printer is connected and turned on. Click the refresh button next to the printer dropdown. On Windows, verify the printer is installed in Settings > Printers.
Colors don't match screen
Try using an ICC profile for your printer/paper combination. Adjust the Brightness Compensation slider. Ensure your monitor is calibrated.
Print appears too dark
Increase the Brightness Compensation setting (try 20-30%). This compensates for the difference between screen brightness and paper.
Mobile upload QR code not working
Check that both devices are on the same network. Firewall may be blocking port 9181. Try manually entering the URL shown below the QR code.
Photos appear blurry when printed
The source image may have low resolution. Use higher resolution photos. Avoid over-enlarging small images. Try increasing DPI to 600.
System Requirements
Windows
- • Windows 10/11 (64-bit)
- • 4GB RAM minimum
- • 100MB available disk space
- • Any printer supporting GDI API
macOS
- • macOS 10.13 or later
- • 4GB RAM minimum
- • 100MB available disk space
- • Supports Intel and Apple Silicon